実装した経緯
ブロックエディタを利用してサイト構築を行なっていたが、PCとスマホでコンテンツの並びが違うため、ブロックの位置を変更しないと実現できないレイアウトに遭遇した。 解決策として、同じ内容のブロックを2つ作成し、PCとスマホで表示するブロックを切り替えることでレイアウトに対応する方法をとった。
前提
私の場合、下記のような状況で作成してます。
- テーマフォルダ内に該当のコードを記述。プラグインではありません。
- Rspackを使用しています。
- パッケージマネージャはyarnを使用
.
├── dist
│   ├── assets
│   │   ├── css
│   │   │   ├── editor-styles.css
│   │   │   └── main.css
│   │   ├── img
│   │   │   └── home
│   │   └── js
│   │       ├── customEditor.js
│   │       ├── editor-styles.js
│   │       └── main.js
│   ├── footer.php
│   ├── functions.php
│   ├── header.php
│   ├── index.php
│   ├── style.css
│   └── theme.json
├── index.php
├── package-lock.json
├── package.json
├── README.md
├── rspack.config.ts
├── src
│   ├── img
│   │   └── 画像フォルダ
│   ├── php
│   │   └── テーマのphpが入っているフォルダ
│   ├── scss
│   │   ├── editor-style.scss
│   │   └── style.scss
│   └── ts
│       ├── _editorModules
│       │   └── _deviceSwitch.tsx
│       ├── _modules
│       │   └── 各モジュール
│       ├── _utils
│       │   └── _utils.ts
│       ├── custom-editor.tsx
│       └── index.ts
├── tsconfig.json
└── yarn.lock
準備
まずは必要なパッケージをインストール
yarn add @wordpress/blocks @wordpress/hooks @wordpress/element @wordpress/components @wordpress/block-editor react react-dom --saveWordPress 用の型定義もインストール
yarn add @types/wordpress__blocks @types/wordpress__element @types/wordpress__hooks @types/wordpress__components @types/wordpress__block-editor --save-devtsconfig.jsonを設定する
{
  "compilerOptions": {
    "jsx": "react-jsx",
    "jsxImportSource": "react",
    "esModuleInterop": true,
    "moduleResolution": "node",
    "forceConsistentCasingInFileNames": true,
    "baseUrl": "./",
    "paths": {
      "@wordpress/*": ["node_modules/@wordpress/*"],
      "@/*": ["src/*"]
    }
  },
  "include": ["src/**/*.ts", "src/**/*.tsx"],
  "exclude": ["node_modules"]
}rspack.config.tsを設定する。必要な部分のみ抜粋
const config: Configuration = {
  //  ... 他設定

  entry: {
    main: "./src/ts/index.ts",
    customEditor: "./src/ts/custom-editor.tsx",
    "editor-styles": "./src/scss/editor-style.scss",
  },
  resolve: {
    extensions: [".tsx", ".ts", ".js"],
  },
  module: {
    rules: [
      {
        test: /\.tsx?$/,
        exclude: [/node_modules/],
        loader: "swc-loader",
        options: {
          jsc: {
            parser: {
              syntax: "typescript",
              tsx: true,
              decorators: true,
            },
            target: "es2020",
            transform: {
              react: {
                runtime: "automatic",
              },
            },
          }
        },
        type: "javascript/auto",
      },
    ],
  },
  externals: {
    "@wordpress/blocks": ["wp", "blocks"],
    "@wordpress/hooks": ["wp", "hooks"],
    "@wordpress/element": ["wp", "element"],
    "@wordpress/components": ["wp", "components"],
    "@wordpress/block-editor": ["wp", "blockEditor"],
  },
}

export default config;
コード
functions.phpでcustomEditor.jsを読み込み
function js_enqueue_editor() {
  wp_enqueue_script('custom-editor', get_template_directory_uri() . '/assets/js/customEditor.js');
}
add_action('enqueue_block_editor_assets', "js_enqueue_editor");
tsxを作成
tsxを使用。_deviceSwitch.tsxに記述。
最終的にcustom-editor.tsxでimportする。
// _deviceSwitch.tsx
import { createHigherOrderComponent } from "@wordpress/compose";
import { InspectorControls, useBlockProps } from "@wordpress/block-editor";
import { PanelBody, SelectControl } from "@wordpress/components";
/**
* デバイス表示属性を追加する
* @param settings
* @returns
*/
const addDeviceVisibilityAttribute = (settings) => {
// すでに設定されていれば何もしない
if ( ! settings.attributes || settings.attributes.deviceVisibility ) {
return settings;
}
// dataDeviceVisibility 属性を追加
settings.attributes.deviceVisibility = {
type: "string",
default: "both",
};
return settings;
};
/**
* ブロックエディターにデバイス表示コントロールを追加する
* @returns
*/
const withDeviceVisibilityControl = createHigherOrderComponent((BlockEdit) => {
// propsはブロックの属性や関数を含むオブジェクト。ブロックエディターがブロックをレンダリングする際に渡される
// propsの型は BlockEditProps で、attributes, setAttributes などが含まれる
// editor.BlockEdit のフィルターフックで使用される
// createHigherOrderComponent は、コンポーネントをラップして新しい機能を追加するための関数
return (props) => {
// props から必要な属性と関数を取得
const { attributes, setAttributes } = props;
// attributes から deviceVisibility 属性を取得
const { deviceVisibility } = attributes;
// デバイス表示オプションを定義
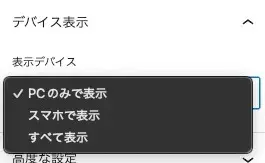
const VISIBILITY_OPTIONS = [
{ label: 'PCのみで表示', value: 'desktop' },
{ label: 'スマホで表示', value: 'mobile' },
{ label: 'すべて表示', value: 'both' },
];
// ブロックのプロパティを取得
// useBlockProps はブロックのプロパティを取得するフック
// ここでは、ブロックのクラス名にデバイス表示クラスを追加するために使用
const blockProps = useBlockProps({
className: `device-visibility-wrapper device-visibility-${deviceVisibility}`,
});
return (
<>
{/* ブロックの設定パネルにデバイス表示コントロールを追加 */}
{/* InspectorControls はブロックの設定パネルを表示するためのコンポーネント */}
<InspectorControls>
{/* PanelBody は設定パネルのコンテナ */}
<PanelBody title="デバイス表示" initialOpen>
{/* SelectControl はドロップダウンメニューを表示するためのコンポーネント */}
<SelectControl
label="表示デバイス"
value={deviceVisibility}
options={VISIBILITY_OPTIONS}
onChange={(value) => setAttributes({ deviceVisibility: value })}
/>
</PanelBody>
</InspectorControls>
{/* ブロックの表示領域 */}
{/* blockPropsで取得したプロパティを適用 */}
<div {...blockProps}>
{/* ブロックの編集コンポーネントをレンダリング */}
{/* BlockEdit はブロックの編集コンポーネント */}
{/* propsを渡して、ブロックの編集機能を提供 */}
<BlockEdit {...props} />
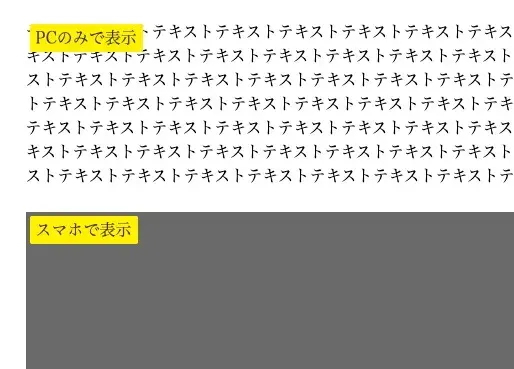
{
// deviceVisibility 属性が 'both' 以外の場合、デバイス表示バッジを表示
// 'both' の場合は表示しない
deviceVisibility !== "both" && (
(() => {
// VISIBILITY_OPTIONS から deviceVisibility に対応するオプションを取得
// オプションが存在する場合、バッジを表示
// オプションが存在しない場合は null を返す
const opt = VISIBILITY_OPTIONS.find(o => o.value === deviceVisibility);
return (opt) ? (
<div className="device-visibility-badge">
{opt.label}
</div>
) : null;
})()
)
}
</div>
</>
);
};
}, "withDeviceVisibilityControl");
/**
* ブロックの保存時にデバイス表示クラスを追加する
* @param extraProps ブロックの保存時に追加されるプロパティ
* @param blockType ブロックのタイプ
* @param attributes ブロックの属性
* @returns
*/
const addDeviceClassOnSave = (extraProps, blockType, attributes) => {
// attributesから deviceVisibility 属性を取得
if (!attributes || !attributes.deviceVisibility) {
return extraProps; // deviceVisibility 属性がない場合は何もしない
}
// deviceVisibility 属性が存在する場合、extraProps にクラスを追加
// デバイス表示属性を取得
const { deviceVisibility } = attributes;
// deviceVisibility 属性が 'both' 以外の場合、クラスを追加
// 'both' の場合はクラスを追加しない
if (deviceVisibility && deviceVisibility !== 'both') {
// 既存のclassNameにデバイス表示クラスを追加
extraProps.className = [
extraProps.className || '',
`device-${deviceVisibility}`
].filter(c => c).join(' '); // 空のクラス名を除外して結合
}
return extraProps;
}
export { addDeviceVisibilityAttribute, withDeviceVisibilityControl, addDeviceClassOnSave };
//custom-editor.tsx

import { addFilter, hasFilter, removeFilter } from "@wordpress/hooks";
import { addDeviceVisibilityAttribute, withDeviceVisibilityControl, addDeviceClassOnSave } from "./_editorModules/_deviceSwitch";

const FILTER_NAME_DEVICE = "my-theme/device-visibility-control";

// 既存のフィルタを削除してから再登録(重複を防ぐ)
if (hasFilter("editor.BlockEdit", FILTER_NAME_DEVICE)) {
  removeFilter("editor.BlockEdit", FILTER_NAME_DEVICE);
}

// ブロックエディターにデバイス表示属性を追加する
addFilter(
  "blocks.registerBlockType",
  "my-theme/add-device-visibility-attribute",
  addDeviceVisibilityAttribute
);

addFilter(
  "editor.BlockEdit",
  FILTER_NAME_DEVICE,
  withDeviceVisibilityControl
);

// ブロックの保存時にデバイス表示クラスを追加する
addFilter(
  "blocks.getSaveContent.extraProps",
  "my-theme/add-device-class-on-save",
  addDeviceClassOnSave
);
設定ができていれば編集画面でこのように表示される。

editor-style.scssで表示を調整
.device-visibility-wrapper {
  position: relative;
}
.device-visibility-badge {
  position: absolute;
  top: 4px;
  left: 4px;
  background: #fff000;
  color: #333;
  font-size: 16px;
  padding: 2px 6px;
  border-radius: 2px;
  z-index: 10;
  pointer-events: none;
  width: max-content;
}

/* デフォルト: 両方/PC向け */
.device-desktop { display: block !important; }
.device-mobile  { display: none !important; }

/* スマホ(768px 以下)では */
@media (max-width: 768px) {
  .device-desktop { display: none !important; }
  .device-mobile  { display: block !important; }
}
終わりに
今回はfunctions.phpに書いたけど、プラグインにした方が多分扱いやすい。